


 |
Add a Landmark
FleetOutlook provides three methods to add a landmark. If you want landmark to apply to your entire fleet, select the Enterprise Group, and then create the landmark. If you want to create a landmark for a specific group, select the group and then create the landmark.
Three Add Methods:
• On Screen Add
• Landmark Add Screen
FleetOutlook allows you to create a landmark using a specific address as the anchor point. This is a quick and easy way to create a landmark for a supply yard or parking lot. Enter the address in the Search field on the map, and then create the landmark using either the Polygon button or the Circle button located in the upper-left corner of the Landmark map.
Note: When you create a Landmark by entering an address in the Add Landmark dialog box, FleetOutlook automatically places the landmark’s anchor point at the physical location of the address, which is typically the street. If your landmark radius or perimeter does not cover the entire property, vehicles may arrive and depart the landmark without detection.
Create an Address Landmark:
1 Select the highest-level group of the Enterprise hierarchy to which you want to configure the landmark.
• All vehicles in the selected group and any group below will have the landmark available.
2. Select the Landmarks tab.
3. Type the landmark address in the Search field (e.g., 13645 Dulles Technology Drive, 20171).
4. Click the Search button or press the Enter key.
• FleetOutlook automatically centers the map and places a push pin at the physical location of the address.
5. In the example below, the physical location on the address is located on the street.
6. Click the Satellite button.
• The Satellite button is a toggle button. When the map is in Satellite view, you will see the Map button.
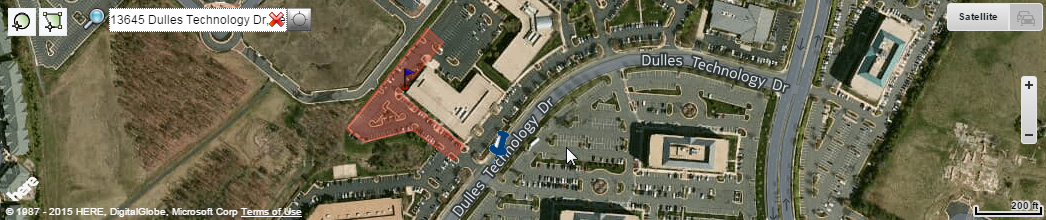
7. Zoom the map to a level that displays the entire physical property.
8. The Polygon and Circle icons are located in the upper-left corner of the screen.
• To create a Circle Landmark: click the Circle icon, and then click on the map to mark the center point for your circle landmark. Move your mouse to set the radius, and then click again to create.
• To create a Polygon Landmark: click the Polygon icon, and then click around the perimeter of the location to draw the landmark border. When finished drawing the border, double-click to create.
• The Add Landmark screen displays. For circle landmarks, the Radius field is displayed. For polygon landmarks, the Vertices field is displayed.
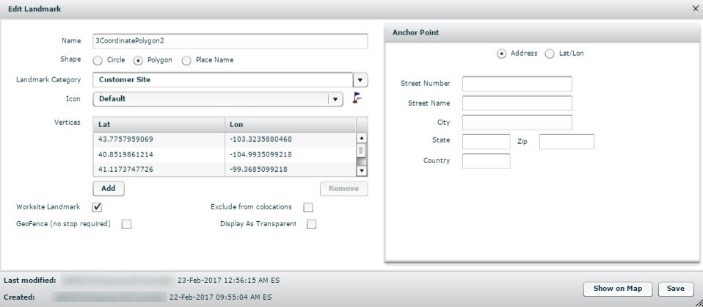
9. Enter a descriptive Name for the landmark (e.g., Herndon Office, Employee Home).
• The name appears on the map and any alerts. A short and easily understood name is best.
10. Select a Landmark Category from the drop-down list of previously created categories or create a new category.
• The Name and Landmark Category fields are required.
11. If needed, select a Landmark Icon from the drop-down list.
12. If appropriate, check the Worksite Landmark check box.
• A Worksite Landmark will display in the Gantt chart of TechDirect in FleetOutlook and will appear as a grey bar, identifying when the vehicle arrived and departed the landmark. This is useful for vehicles that may not have work orders assigned and will show their day as they move from worksite to worksite
13. If appropriate, check the GeoFence checkbox.
• A GeoFence landmark does not require a stop or ignition off event to trigger landmark detection. Useful to identify locations that do not require a stop event.
14. If appropriate, clear the Exclude from colocations check box.
• The Exclude from colocations option only displays if your Enterprise has colocation enabled. All FleetOutlook landmarks are excluded from colocation reporting by default. FleetOutlook records colocation events when two or more vehicles are detected at the same location for more than the specified work stop duration. To enable colocation reporting for your enterprise, contact Customer Support by phone 1.866.456.7522 or by email solutionsupport@calamp.com.
15. If appropriate, check the Display As Transparent check box.
• The Display as Transparent option enables you to hide the landmark from the map display. This will be helpful when you have created a very large landmark and you don’t want the shading to cover the map.
16. Click the Save As New button.
• FleetOutlook creates the landmark and displays it on the Active tab.