


 |
Driver Bulk Upload
You can create and save numerous drivers at once using theDriver Bulk Upload feature. Bulk Upload uses a CSV formatted file, which enables you to quickly save numerous drivers with a single action. The Driver Bulk Upload feature is primarily used for the initial setup of FleetOutlook. FleetOutlook has three bulk templates: Drivers, Drivers and Vehicles and Schedule Profiles.
Driver Bulk Upload Considerations:
• Use the Vehicles and Drivers template to create the vehicle and assign the driver to the vehicle at the same time.
• If you use the Vehicles and Drivers template, you will need to add vehicle supporting information manually. This information includes license plate, year make and model of the vehicle but the information is optional in FleetOutlook. See Add/Edit Vehicles help for more information. You may also bulk upload Vehicle information.
• If you upload drivers only, you need to pair drivers to vehicles manually.
• Setup all groups first, as this will allow you to upload drivers into specific groups.
• Before beginning the upload sequence, select the group you wish to place the drivers in during the upload. If you wish to have them placed in several groups, you will need to perform several uploads.
• If Driver ID already exists, active or retired, you will not be able to upload the driver.
• If the Vehicle ID already exists, and you are using the Vehicle and Driver upload file, you will not be able to upload the driver due to an error for the duplicate vehicle.
• FleetOutlook allows a bulk upload of driver or driver-vehicle pairings. This is primarily for the initial setup of FleetOutlook. If Vehicle IDs are already in FleetOutlook, you will not be able to pair drivers to vehicles using the upload. Pairings will need to be done manually.
To Bulk Upload Drivers:
1 Select the Drivers tab, and then select the Active tab.
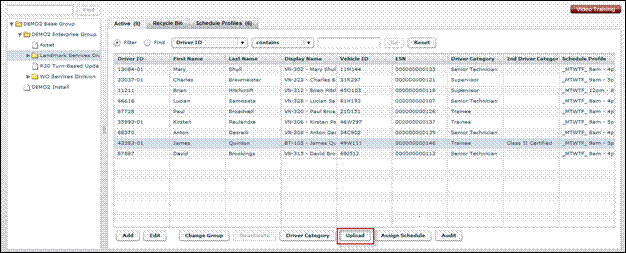
2. Click the Upload button.
• The Upload Drivers screen displays.
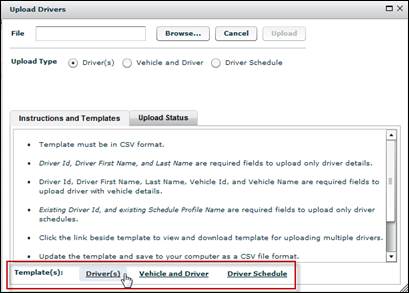
3. From the Templates section, click a template link (e.g., Driver(s), Vehicle and Driver and Driver Schedule).
4. Navigate to where you want to store the template, and then click the Save button.
5. Open the downloaded Drivers template from the save location.

6. Delete the sample rows of information, and then add the information for your drivers, vehicles or schedule profiles. Do not edit the column header names.
• If a required column is blank, the upload for that driver will fail.
7. Click the Save button.
• If you are using Microsoft Excel, you may receive a feature compatibility warning. Click the Yes button to keep the workbook in CSV format.

8. Navigate back to Drivers tab in FleetOutlook Admin.
• If the Upload Drivers screen is not displayed, click the Upload button.
9. From the Upload Drivers screen, select the Upload Type option.
10. Click the Browse button to upload the saved bulk upload file.
• The Open dialog box displays.
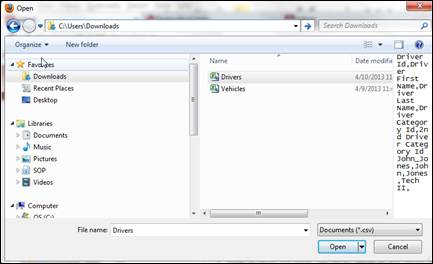
11. Select the saved bulk upload file, and then click the Open button.
• FleetOutlook automatically populates the File field of the Upload Drivers screen with the saved file name.
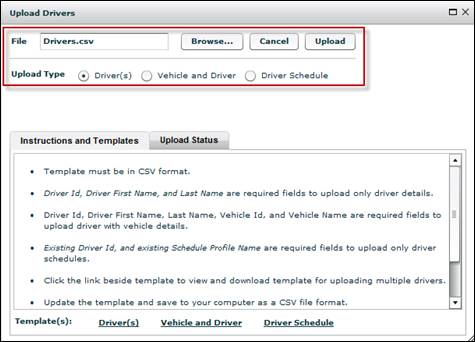
12. Click the Upload button.
• FleetOutlook uploads the drivers and displays the Upload Status tab.

• Each row represents a new driver. FleetOutlook indicates if the driver uploaded successfully or failed. For any drivers that failed, you will have to fix the errors and re-upload them or create the driver manually within FleetOutlook Admin.
13. Click the Close button in the upper-right corner of the screen.
• FleetOutlook displays all successful drivers on the Active tab.